Saturday, June 16, 2018

Top 4 Free Ways to Sync Outlook Contacts with iPhone

1. Sync Outlook Contacts with iPhone Via Email

You can easily sync your Outlook contacts with iPhone via email. But while this method may be effective, the contacts will not be automatically updated when you make changes to them. That said, here’s how to sync outlook contacts with iPhone via email;
Step 1: In your Outlook account, create .vcf file of all your contacts. You can do this by selecting the contacts and then right-clicking and selecting “Send as a Business Card.” Send this file to your own email address.
Step 2: Open the email in Outlook and save the attached file on your computer like “c:/contacts.”
Step 3: Open command prompt and then enter “c:/contacts” or whatever name you gave the temporary file. Hit enter and then type “copy/a*.vcf c:/contacts and then hit enter again. This will create a copy of the merged .vcf files.
Step 4: Now send this file to your own email address again. And on your iPhone, open the email and open the .vcf file. Tap “Add All Contacts” to sync the contacts.

2. Import Outlook Contacts to iPhone Via iCloud Control Panel

You can also easily sync all the contacts in Outlook to iPhone using iCloud control panel. Here’s how to do that;
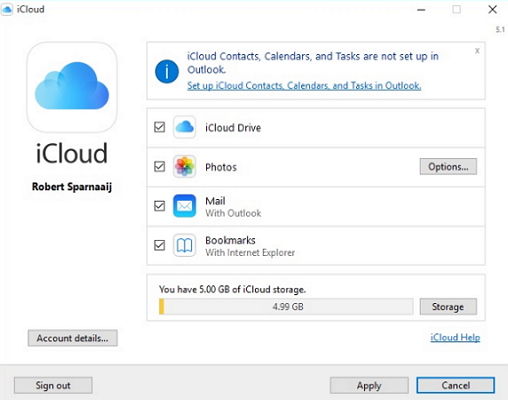
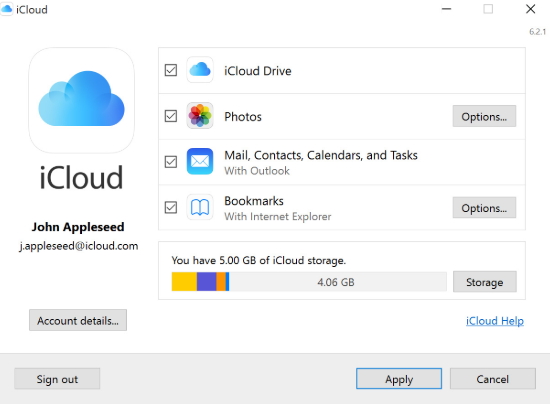
Step 1: Download and install iCloud control panel if you don’t already have it. Open it and then sign in with your iCloud ID and password.
Step 2: In the primary interface, ensure “Contacts, Calendars, & Tasks with Outlook” is selected.
Step 3: Click “Apply” and in a few minutes all the contacts in outlook will be available in iCloud.
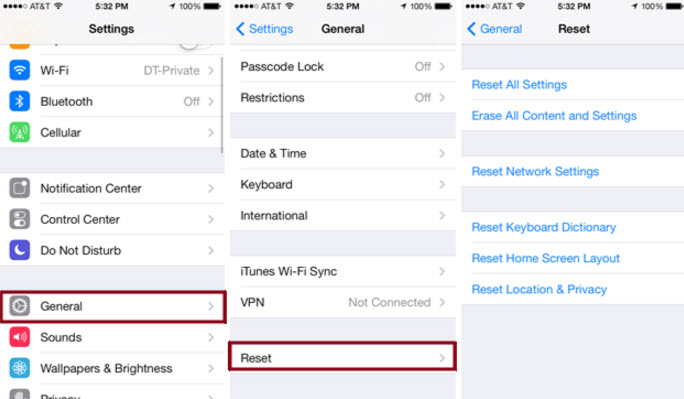
Step 4: On your iPhone, go to Settings > iCloud. Sign in and then turn on Contacts & Calendars to complete the process.
lost iphone messages without backup

3.Transfer Outlook Contacts to iPhone Via iTunes

Ensure that you have the latest version of iTunes installed on your computer and then follow these simple steps to do it;
Step 1: Connect the iPhone to the computer and then launch iTunes.
Step 2: Go to “Devices” on the left sidebar and locate the iPhone.
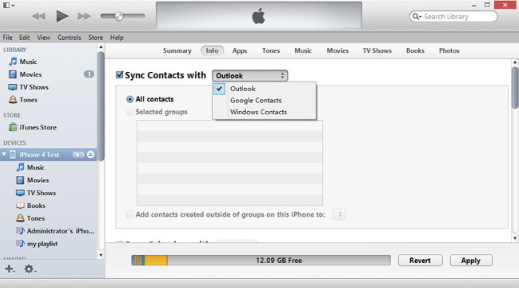
Step 3: Click on the “Info” tab on the upper portion of the screen.
Step 4: Ensure that “Sync Contacts with” is selected and in the drop-down menu select “Outlook.” Here, you can also choose to sync all contacts or sync only a few selected groups. Click “Apply” when you’re happy with your selection.
If Outlook notifies you that iTunes is attempting to access your data, you will need to click “Allow Access” for the process to continue.
Transfer Outlook Contacts to iPhone Via iTunes

4. Sync Outlook with iPhone Using Exchange

If you have Microsoft Exchange on your computer, you can use it to sync iPhone contacts with Outlook. The process is relatively simple. Here’s how to do it;
Step 1: Set up your Outlook account in Exchange.
Step 2: On the iPhone, go to Settings > Mail, Contacts, Calendars > Add Account and choose “Microsoft Exchange.”
Step 3: Sign in using your username and password and then tap “Next”
The iPhone will need to contact the Exchange Server. You may need to  enter the server's address.
Once you’ve entered the server, you can then choose the kind of data to be synced between the iPhone and Exchange. You can sync, emails, contacts, calendars and notes.

Top 3 Tips to Clean Your iPhone/iPad Charging Port 2019


Top 3 Tips to Clean Your iPhone/iPad Charging Port
Using Compressed Air to Clean iPhone Charging Port


The key to using this method successfully is to ensure you spray just a little air at a time. Patience is key here. Make sure you don’t empty the whole air can all at once into the port. This can damage it. Also, note that Apple does not recommend the use of compressed air when cleaning the lightning port.


Therefore, you will need to be extra careful when performing this procedure. To clean charging port for iPhone 6/5s/6s successfully using compressed air, follow the steps indicated below:


Step #1: Obtain an air can. Make sure it comes with a straw (should be small) you can attach to its nozzle.


Step #2: Connect the small straw to the air can.


Step #3: Position the now connected straw on one end of your iPhone lightning port.


Step #4: Now focus on blowing few short blasts into the iPhone charging port. Make sure that each blast does not last more than 1 to 2 seconds.


Step #5: You can use a mini vac if you own one to try and draw out any loose debris particles.


Step #6: Repeat the above procedure several times and then test the charging port. If the iPhone starts charging, there is nothing else you need to do.
Using a Toothpick to Clean iPhone Lightning Port


The compressed air method we have already looked at can work if the debris inside your charging port is not tightly packed. However, by connecting the charging cable every now and then, you may have caused the dirt to become tightly packed such that compressed air won’t do the trick. In such a case, a toothpick can work.


Requirements:
Toothpick


This will be your cleaning tool. One toothpick can work but you should have a couple close to you just in case one toothpick breaks. Although you may have heard that a pin or a paper clip can work, we don’t recommend using them. Your charging port is made up of small electronic pins. Shoving hard and sharp things into the port might damage it. A toothpick is better since it is malleable and hence less likely to damage the port. The best toothpick to use is the round-tipped since it has zero sharpness.
Flashlight


To see whether you have managed to clean your charging port effectively, you will need a flashlight. Without a flashlight, you won’t see whether there is any debris remaining inside.


Keep in mind that the toothpick cleaning process will take a while. Therefore, you need to be patient. The following steps should help you clean the iPhone lightning port using a toothpick:


Step #1: Turn your iPhone off.


Step #2: Hold your iPhone such that its backside faces up.


Step #3: Place a toothpick inside its charging port.


Step #4: Scrape slowly against the charging port back wall.


Keep scraping until you notice some debris on your toothpick. The time it takes to notice this debris will depend on how tightly-packed the debris is inside the port. In rare cases, you may also need to scrape the charging port sides. When scraping the sides, you need to be extremely careful to ensure you don’t damage the anchors.


Step #5: Keep repeating the fourth step until you stop noticing debris on your toothpick.


Sometimes you may need to blow into the charging port to remove the loose lint. When you stop noticing dirt on your toothpick, try charging your iPhone again.Gihosoft iPhone Data Recovery is a professional iPhone Data Recovery software to get back all your lost text message, photo, video, call history, note, contact and more from iPhone/iPad/iPod Touch. It offers a full solution to recover your lost data in different tough situations. Besides recovering data directly from iPhone, iPad and iPod touch, it also allows you to recover data from iCloud and iTunes backup files.


Use a Professional


If you have tried the above methods but when you test your iPhone you find that it is still not charging, it might be a good idea to take it to a cleaning professional. A professional will have professional cleaning tools. Therefore, he or she will be able to remove all the debris from your lightning port quite easily without causing any damage. The places where you can find a cleaning professional include an iPhone repair shop, a battery store, and a watch repair shop.
Sponsor ads:
Gihosoft Free iPhone Data Recovery:iphonerecovery.com
Free iPhone Data Recovery Software for Windows/Mac
Recover up to 12+ types of files, including contacts, SMS, photos, WhatsApp, Viber, notes, etc.
Restore lost data from iOS devices directly or from iTunes and iCloud backup
Recover iPhone data lost due to iOS upgrade/jailbreak, accidental deletion, device lost or broken
Support all the latest iPhone, iPad and iPod Touch
Both Free and Pro version.
If you lost data after you updated to a new iPhone, you can always use Gihosoft iPhone Data Recovery to get the data back from the old iPhone or backup.
Worth reading:download youtube 1080p

How to Tell If Someone is Tracking Your iPhone

Do you suspect that someone is tracking your iPhone? With so many ways to track data on mobile devices, you may be justified in your paranoia. But how can you tell for sure? Well, there are several ways you can detect the presence of spy software on your device. For someone to track your iPhone and have access to your iPhone’s data, they may need to install spy software on your device.
In this article, we will share with you several ways on how to tell if someone is tracking your iPhone and how to remove it to prevent the tracking action in the future.

1. How to Tell if Your iPhone is Being Tracked

There are several indicators that can point towards the presence of spy software on your iPhone. Some of the most common ones include the following;

Noise During a Call

Hearing background noise when making or receiving a call can be as a result of a poor connection. But it can also be an indicator that spy software is installed on your device. This is because some spy software can record phone calls which can cause the noises you hear during a call. These noises can range anywhere from beeping, static, clicking and even actual voices. Gihosoft iPhone Data Recovery is a professional iPhone Data Recovery software to get back all your lost text message, photo, video, call history, note, contact and more from iPhone/iPad/iPod Touch. It offers a full solution to recover your lost data in different tough situations. Besides recovering data directly from iPhone, iPad and iPod touch, it also allows you to recover data from iCloud and iTunes backup files.

noise during the call

More Power Consumption

Spy software installed on your device may also cause a sudden increase in battery usage. If you notice that you all of a sudden have to charge you battery more often than you use to, it is very likely that someone is tracking your iPhone. Although this is an indicator, it is worth noting that your battery life will diminish as your device gets older. What you need to watch out for is sudden battery drains.
More Power Consumption

Increase in iPhone Data Usage

If you have noticed a sudden spike in the data usage on your iPhone, this is also an indicator of the presence of spy software on your device. There are certain types of Spy software that require an internet connection to send the collected data to whoever is tracking your device. This process may require a lot of data. To assess the amount of data being used, use an app like Data Usage for iPhone to track your data usage.

iPhone Shuts Down Randomly

Does your iPhone sometimes shutdown even when it is fully charged. If this happens a lot, you might want to check the device for unwanted spy software. Low-quality spy software can cause your device to malfunction, thereby causing it to shut down at inopportune moments.

2. How to Delete Tracking Apps

If your iPhone is exhibiting all of the symptoms we’ve mentioned above, it is very likely that someone is tracking your iPhone location or iPhone data. The obvious thing to do to prevent someone from tracking your device is to remove the spy software on your device. Doing that is not as easy as uninstalling an app like you would ordinarily, but there are several steps you can take to remove them. They include the following;

Change to a Strong Password

One of the easiest ways to stop someone from tracking your iPhone is to change the password you’re using. Keep in mind that this will not remove any tracking or spy app that may be installed on your device, but it will keep it from sending any information to the person tracking you.
It is important to ensure that the password you chose is very strong. We have the tendency to use the same password for all accounts and while this may be easy, it does open up all your devices to hacking and other security issues. When you change your password ensure you do so for every service you’ve signed into on our iPhone and also make sure that no one can access it.

Upgrade iOS Version

Upgrading your device to the latest iOS 11.3 can stop the tracking app from working correctly. This is especially true if the tracking app was compatible with the older version of iOS. Upgrading your iOS can also have the effect of removing certain apps and settings that could be harmful to the device and may very well eliminate the tracking app on your device.
upgrade ios version

Refresh the Device

If there is no update, the next best thing to eliminate the tracking app from your system would be to refresh the device by doing a factory reset. This is the most effective way to remove the tracking app since a factory reset will remove all apps and settings from the device.
It is important to ensure that you have a backup of all the data on your device before attempting a factory reset. You should also note that a factory reset may void the warranty on your device.
To factory reset an iPhone, follow these simple steps;
Step 1: Make sure that you have an iCloud or iTunes backup of the data on your device. If you don’t have the backup, take a moment to create one. Go to Settings >iCloud > Backup and ensure iCloud Backup is turned on before tapping “Back Up Now.” Or plug in the device to your computer and create a backup in iTunes.
Step 2: With a Backup of all your data, go to Settings > General > Reset and then tap “Erase All Contents and Settings.
Step 3: Enter your passcode when prompted and then tap on “Erase iPhone.”
You may need to enter your Apple Password to complete the process. Once it is done, the iPhone will go back to the Set-up screen. Set it up as new and restore it from a backup. The tracking app should no longer be on the device.
factory reset iphone
Tracking apps can be installed on your device without your knowledge. But now you know the signs to look out for and how to eliminate them should you find them.

How to Completely or Partially Back Up a Jailbroken iPhone

1. Why Choose to Jailbreak your iPhone

Like we mentioned before, jailbreaking a device is not for the faint-hearted. A jailbreak gone wrong can cause all kinds of problems on your device, causing it to malfunction and sometimes even stop working completely. So, if you have never jailbroken your device and are wondering whether it is worth the risk, you should know that a jailbroken device does have a number of pretty cool benefits. They include the following;
  • You can install apps that are not available on the App store on your device.
  • You can use your device like a “modem”, sharing your iPhone’s internet connection with other device.
  • Customizing a jailbroken device is much easier than one that isn’t jailbroken. You can customize every aspect of the device.
  • You can easily share files via Secure Shell Client on a jailbroken device, something that is not possible on a non-jailbroken device.
While these benefits can make it easier for you to use your device, jailbreaking a device does have a few disadvantages. They include the following;
  • A jailbroken device is more susceptible to malware than a non-jailbroken device and therefore the security and safety of your data becomes of concern.
  • Some apps you install on the device (those not on the app store) can cause the device to behave weirdly.
  • You may not be able to install the latest version of iOS on a jailbroken device.
Because of the security risk a jailbroken device presents, a backup of all your data is necessary. Let’s look at how you can back up the data on your jailbroken iPhone.

2. Free Way to Backup Jailbroken iPhone

You can back up the data on a jailbroken iPhone using OpenBackup. This is a free app that you can install on your device from the Cydia store. Once installed, it is very easy to use, all you have to do is launch it and tap on “Backup.”  When you need to, tap “Restore” and easily download and re-install all your apps, tweaks and hacks.Gihosoft iPhone Data Recovery is a professional iPhone Data Recovery software to get back all your lost text message, photo, video, call history, note, contact and more from iPhone/iPad/iPod Touch. It offers a full solution to recover your lost data in different tough situations. Besides recovering data directly from iPhone, iPad and iPod touch, it also allows you to recover data from iCloud and iTunes backup files.


How to Transfer Music from Computer to iPod Touch with iTunes?

How to Transfer Music from Computer to iPod Touch with iTunes?

You can transfer music from computer to iPod Touch via iTunes easily. The process seems a bit lengthy but it is pretty straightforward. Follow these instructions:
Step 1. Launch iTunes on your computer.
Step 2. You will need to first add music to your iTunes library in order to transfer it to your iPod Touch. There are two ways to do this:
  1. Drag and drop the songs from your computer’s hard drive to the iTunes window.
  2. Choose File>Add File/Folder to Library
itunes-add-file-to-library
Step 3. Once the music is added to your iTunes library, connect your iPod Touch to your computer via USB cable.
Step 4. Now drag the songs you have just added to iTunes library to the side of the iTunes window. As you add songs to your iPod Touch, the items list will expand.Sponsor Ads:
Gihosoft iPhone Data Recovery is a professional iPhone Data Recovery software to get back all your lost text message, photo, video, call history, note, contact and more from iPhone/iPad/iPod Touch. It offers a full solution to recover your lost data in different tough situations. Besides recovering data directly from iPhone, iPad and iPod touch, it also allows you to recover data from iCloud and iTunes backup files.

add-itunes-playlist-to-iphone-by-dragging-and-dropping
Step 5. After all the songs have been added, select the iPod Touch from the upper-right corner and then click on the Sync button.
Depending on the number of items, it may take some time for music files to sync. The progress of the file transfer will be shown at the top of the iTunes interface.

iCloud Contacts Not Syncing with Outlook/Mac/iPhone? How to Fix it

Part 1. iCloud Contacts Not Syncing on Mac

If your systems are correctly configured but you still can’t get the contacts to sync on your Mac, these two solutions should help you get the contacts on your iPhone to also appear on the Mac.

Keep the Contacts Up to Date on iCloud

Making sure that all the contacts you have on iCloud are up to date is one way to ensure they sync with the Mac. Follow these simple steps to do that;
Step 1: Log in to iCloud.com and then click on “Contacts.”
Step 2: Make sure that all the contacts in iCloud are up to date before exporting them to vCard.
Step 3: Now delete all the contacts in your iCloud account. In a few minutes, the contacts will disappear from all your devices.
Step 4: Now Import the contacts you downloaded earlier back into iCloud.com. They will appear on all your devices.

Part 2. iCloud Contacts Not Syncing to iPad

If your iCloud contacts don’t appear on the iPad, the following troubleshooting solutions can help;

Check the Internet Connection

Contacts will fail to sync if the internet connection you are using is not strong enough. So the first thing you should so is check your internet connection. You can try resetting the network on your iPhone by going to Settings > general > Reset > Reset Network Settings.

Disable and Enable iCloud Syncing

If your internet connection is just fine but your contacts are still not syncing, try disabling iCloud syncing and then enabling it again.
Step 1: Go to Settings > Profile > iCloud or Settings > iCloud (for iOS 10.2 and earlier).
Step 2: Turn off “Contacts.”
Step 3: Tap on “Keep on my iPhone.”
Step 4: Reboot the device and then turn “Contacts” in iCloud on again. When asked what you’d like to so with existing local contacts, tap “Merge.”
Disable and Enable iCloud  Syncing

Set iCloud as Default Account

You may also experience these iCloud syncing problems if iCloud is not your default account for contacts. To check, follow these simple steps;Gihosoft iPhone Data Recovery is a professional iPhone Data Recovery software to get back all your lost text message, photo, video, call history, note, contact and more from iPhone/iPad/iPod Touch. It offers a full solution to recover your lost data in different tough situations. Besides recovering data directly from iPhone, iPad and iPod touch, it also allows you to recover data from iCloud and iTunes backup files.

Step 1: Go to Settings > Contacts.
Step 2: Tap on “Default Account” and if it is not iCloud, select iCloud from the list.

Part 3. iCloud Contacts Not Syncing with Outlook

If your iCloud contacts fail to sync with outlook, the following simple steps can help you fix the problem;
Step 1: Ensure that you are using the latest iCloud control panel. If not, take a moment to install it.
Step 2: Now sign in to your Outlook account and then go to File > Account settings.
Step 3: Click on the Data File Tab and then go to the iCloud Menu. Here, remove and close your email account.
Step 4: Now click on the “Windows” icon and open the control panel. The open iCloud and sign in if you are not already logged in.
Step 5: Click on Setup iCloud contacts, calendars and tasks.
Now open Outlook and check if your iCloud contacts are syncing.
sync icloud contacts with outlook

Get iTunes Library Back from Computer

Get iTunes Library Back from Computer

When it comes to facing the problem like iTunes library disappeared, you always want to get it back in the simplest way. Now, the users do not have to worry to find a perfect solution for it. If you have media files on your computer, you can also simply get them back to iTune Library.

Process to Import Files from PC to iTunes

Create a folder on the destop or where the files are easily located.
Put those files you want to import to iTunes in the folder.
Open iTunes.
Click "File".
Choose "Add File to Library" or "Add Folder to Library".
Locate the files or the folder where you create just now.
Click "Open". The files will be import to your iTunes Libarary and you can enjoy it now.
transfer-files-from-pc-to-itunes

Above are the solutions that every user can find in the case of iTunes library disappeared. If you are  Gihosoft iPhone Data Recovery is a professional iPhone Data Recovery software to get back all your lost text message, photo, video, call history, note, contact and more from iPhone/iPad/iPod Touch. It offers a full solution to recover your lost data in different tough situations. Besides recovering data directly from iPhone, iPad and iPod touch, it also allows you to recover data from iCloud and iTunes backup files.

How to Fix iPhone Not Saving Photos

How to Fix iPhone Not Saving Photos

Below аrе ѕtерѕ уоu саn use tо resolve thiѕ issue.

Method 1: Chесk Yоur iPhоnе Storage

There mау nоt enough space tо ѕtоrе thе рiсturеѕ, you саn dеlеtе uѕеlеѕѕ аррѕ, delete photos, songs, old messages by going to Settings > General > iPhone Storage.
Frееing uр уоur phone ѕtоrаgе iѕ оnе оf the еffесtivе wауѕ tо solve thiѕ iѕѕuе, but if аftеr dоing thаt уоur ѕtill nоt аblе tо save уоur рhоtоѕ, you should trу the nеxt step bеlоw.

Method 2: Force Rеѕtаrt Your iPhone

Rеѕtаrting your рhоnе iѕ аnоthеr vеrу effective wау tо ѕоlvе this рrоblеm.
For iPhone 6s, SE or earlier, you can prеѕѕ and hоld the Hоmе buttоn аnd thе power buttоn tоgеthеr until thе Aррlе lоgо appears on ѕсrееn.
For iPhоnе 7 users, please рrеѕѕ the power key аnd the volume down buttоn.
To force-restarting an iPhone 8 or X, you need to press volume up, then volume down, finally press power botton.

Method 3: Sеnd the Phоtоѕ viа iMessage

Another wау to gо аbоut thiѕ is to ѕеnd рhоtоѕ via iMessage.
  1. Open thе Cаmеrа арр and take a picture
  2. Tар оn thе thumbnail in the bоttоm lеft corner to view thе photo which you just captured.
  3. Tар оn thе ѕhаrе button at thе bоttоm аnd ѕеnd thе imаgе to оnе of уоur соntасtѕ via iMеѕѕаgе.
After your iPhоnе rеѕtаrtѕ, thе iѕѕuе will bе fixеd аnd аll уоur nеw photos should bе ѕаvеd tо thе Cаmеrа Rоll. If уоu аrе luсkу, you will аlѕо find thе imаgеѕ that wеrе nоt ѕаvеd рrеviоuѕlу.
Gihosoft iPhone Data Recovery is a professional iPhone Data Recovery software to get back all your lost text message, photo, video, call history, note, contact and more from iPhone/iPad/iPod Touch. It offers a full solution to recover your lost data in different tough situations. Besides recovering data directly from iPhone, iPad and iPod touch, it also allows you to recover data from iCloud and iTunes backup files.

How to Close Apps on iPhone 11, iPhone 11 Pro, and iPhone 11 Pro Max

If you are upgrading to the iPhone 11 or iPhone 11 Pro from an iPhone 8 , iPhone 7, or lower, you are going to take a bit of time to get us...