Saturday, June 16, 2018

How to Empty iCloud Backups

Part 1: How to Empty iCloud Backups

Many apps tend to back in your iCloud automatically and may be the ones consuming more space. If you decide to free up iCloud storage by deleting the apps that you do not need in the storage, then this is the way to go.
If you are having an iPhone, iPad, or iPod touch with iOS 10.3 or later:
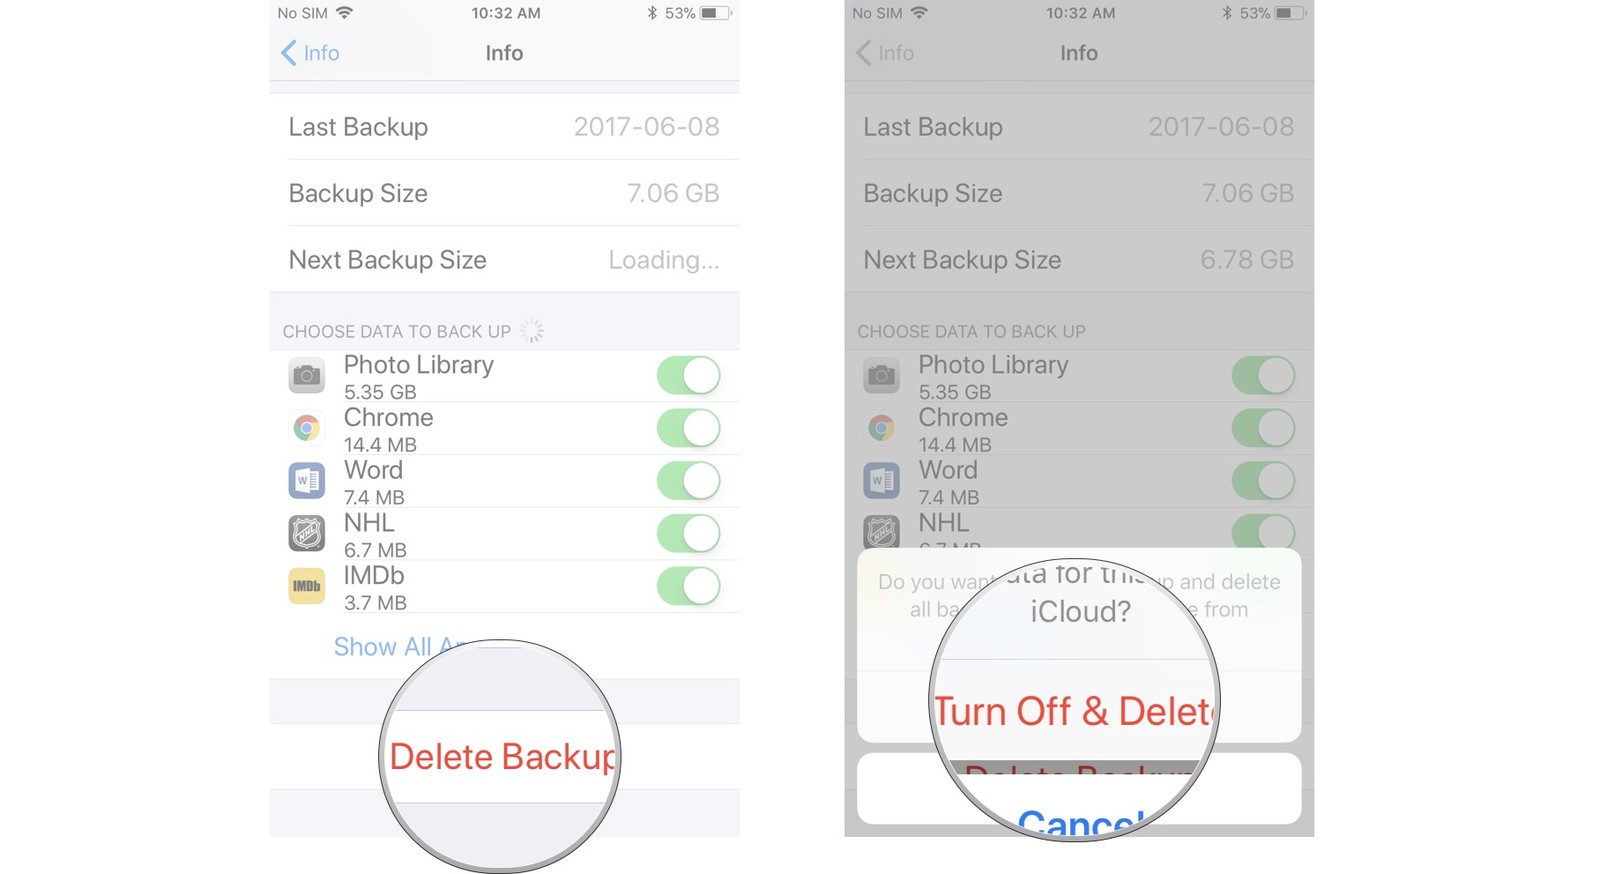
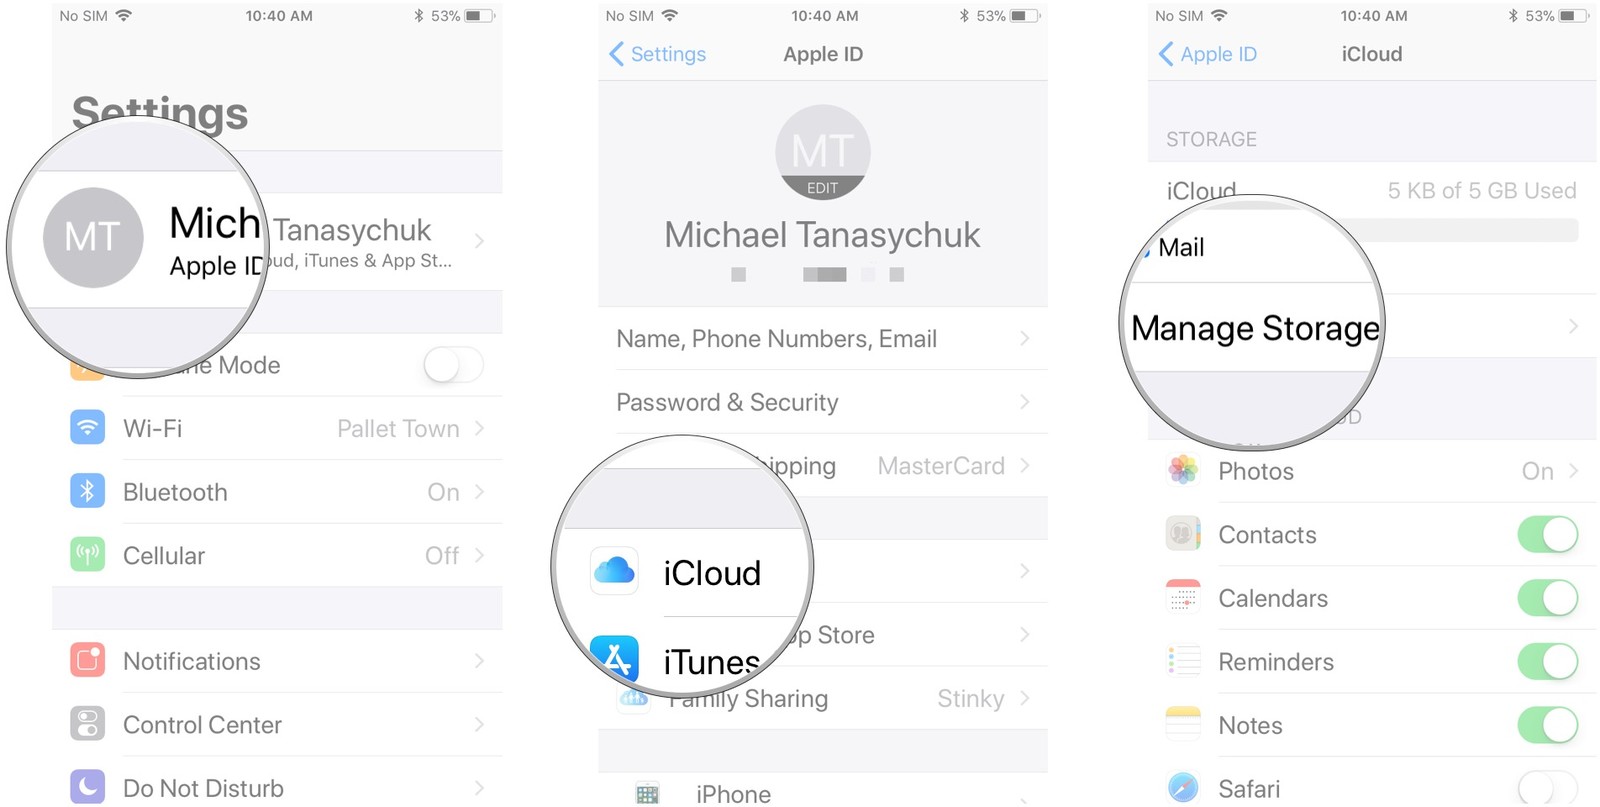
  • Go to Settings > [your name] > iCloud.
  • If you use iOS 11, tap Manage Storage > Backup. If you use iOS 10.3, tap iCloud Storage > Manage Storage.
  • Tap the name of the device you are using [i.e. (Device-name) This (device type)].
  • Tap Delete Backup > Turn Off & Delete.
Sponsor Ads:
Gihosoft iPhone Data Recovery is a professional iPhone Data Recovery software to get back all your lost text message, photo, video, call history, note, contact and more from iPhone/iPad/iPod Touch. It offers a full solution to recover your lost data in different tough situations. Besides recovering data directly from iPhone, iPad and iPod touch, it also allows you to recover data from iCloud and iTunes backup files.

How to Fix iCloud Backup Won’t Turn on (2018)

How to Fix iCloud Backup Won’t Turn on (2018)

Top 7 Ways to Fix iCloud Backup Won’t Turn on Issue

Knowing why iCloud backup button won't turn on is not enough. You need to know how to fix this issue. To help you out, we have researched on 7 ways you can use to make your iCloud backup turn on again.

1Sign out and back to Your iCloud Account

Sometimes, the reason as to why your iCloud backup won’t turn on is due to verification issues with your account. Logging out and then logging in can help fix this. But, how do you do it? Follow the steps indicated below:
Step 1: Open the iPhone settings.
Step 2: If your device is running on iOS 10.2 and above, tap the Apple ID, scroll down and tap on Sign Out. If your device is running iOS 10.1 or earlier, tap on iCloud and then Sign Out.
Step 3: Your device will ask you whether you want to erase all settings. Confirm this. You will be logged out from your iCloud account after the confirmation.
Step 4: Use the Apple ID and Password to sign in again. Check if the issue has been fixed.
sign out of icloud

2Reset Network Settings

The reason as to why you don’t have the ability to back up your device using iCloud may be as a result of a network issue. To fix this issue, perform a network reset. The following steps will help you reset your network settings:
Step 1: Open your device settings.
Step 2: Tap on General.
Step 3: Select Reset.
Step 4: Tap on Reset Network Settings.
Step 5: Confirm you want to reset the network settings.
check network settings

3Check Your Wi-Fi Connection

Since iCloud can back up a large amount of data in a single backup, the backups can only work over Wi-Fi. For this reason, your device has to be connected to Wi-Fi for iCloud backup to work. Here is how you connect to Wi-Fi.
Step 1: Open Settings.
Step 2: Tap on Wi-Fi.
Step 3: Select the Wi-Fi network you want to connect to.
Step 4: If prompted, enter the Wi-Fi Password and tap on Join.
enter-wifi-password-ios-11

4Update Your Device

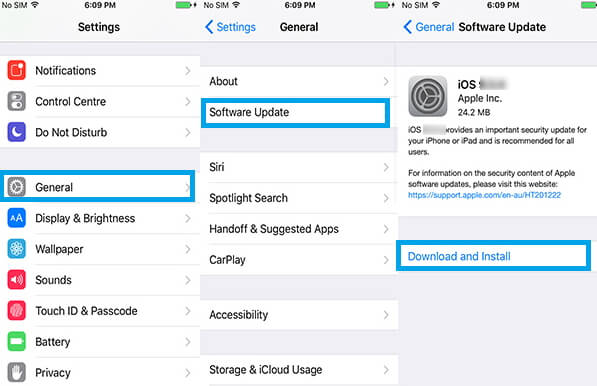
iCloud backup may not work if you don’t have the latest iOS system installed. Follow the steps below to update your iPhone:
Step 1: Visit Settings.
Step 2: Select General.
Step 3: Select Software Update to see if any updates are present.
Step 4: If any updates are available, go ahead and update the device. This may take a while, therefore, make sure you have enough battery.
iphone-software-update

5Restart You iPhone/iPad

Restarting your iPhone or iPad can help fix the bugs causing your iCloud not to turn on. Here are some simple steps to follow:
iPhone X
Step 1: You will need to press and then keep holding the device Side button together with one of the volume buttons. Wait until a slider appears.
Step 2: Drag this slide to turn the iPhone X off.
Step 3: After the device turns off, you need press and keep holding its side button for the second time until you see an Apple logo.Gihosoft iPhone Data Recovery is a professional iPhone Data Recovery software to get back all your lost text message, photo, video, call history, note, contact and more from iPhone/iPad/iPod Touch. It offers a full solution to recover your lost data in different tough situations. Besides recovering data directly from iPhone, iPad and iPod touch, it also allows you to recover data from iCloud and iTunes backup files.

restart iphonex
iPad/iPhone 8 and Earlier
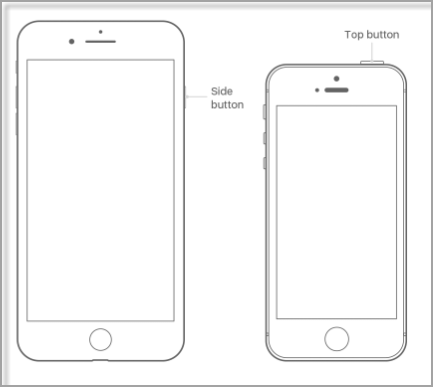
Step 1: You will need to press and then keep holding the side (or Top) button until a slide appears.
Step 2: Next, drag this slider to turn off your device
Step 3: When your device turns off, you will have to press and then hold the device side (or Top) button until an Apple logo shows.
restart iPhone8

6Factory Reset Your Device

Note that although this method has proven to be both convenient and efficient, it will erase your device data. Therefore, it should come as the last solution if the above solutions fail. To reset your phone, follow the steps indicated here:
Step 1: Launch Settings.   
Step 2: Tap on General.
Step 3: Scroll down and tap Reset.
Step 4: Select the option for erasing all settings and content.
Step 5: Enter the Device password to confirm.
iphone-reset-all-settings

7Manage Your iCloud Storage

Maybe the reason as to why your iCloud backup can’t turn on is because the space available is not enough. To manage your iCloud storage, follow the steps below:

Check iCloud Storage Available

Step 1: Open Settings.
Step 2: Tap Apple ID.
Step 3: Tap iCloud.
Step 4: Tap Storage to see the space available.
check-iCloud-storage

Manage iCloud Storage

Step 1: Tap on Manage Storage.
Step 2: Tap on Backup.

Purchase More iCloud Storage

If there isn't enough storage, you may need to click Delete Backup to create room. If deleting your previous backups is not an option for you, you can choose fewer files to back up. You can also purchase more storage by following the steps below:
Step 1: Tap on Settings.
Step 2: Tap on Apple ID.
Step 3: Click Storage.
Step 4: Go to Manage Storage.
Step 5: Select Change Storage Plan.
change-icloud-storage-plan

An Alternative to iCloud for Backing Up iPhone with iTunes

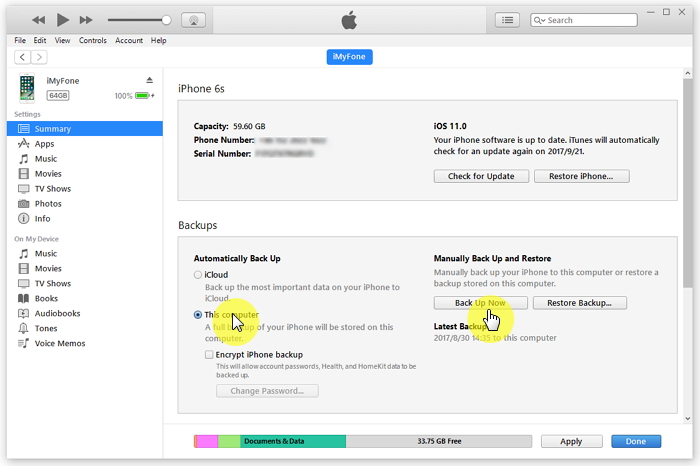
iTunes is another great backup method that Apple offers its device users. Using iTunes is not hard. By following the simple steps indicated below, you should be able to backup your iPad or iPhone on iTunes in minutes:
Step 1: Open iTunes on your Mac or PC.
Step 2: Connect the device to your computer.
Step 3: Follow the onscreen steps if asked to Trust This Computer or for a passcode.
Step 4: Select your device when it shows on iTunes.
Step 5: To save your Health and Activity information, you have to encrypt the data. Select Encrypt [device] Backup and then create a password you can remember. For other data types, there is no need for encryption. Just click on Back Up Now.
Step 6: To see whether the backup is finished, check the Summary screen.
backup iphone to itunes

Friday, June 15, 2018

iPhone Locked after Update?

iPhone Locked after Update? Unlock iPhone with iTunes

If your iPhone locked up after update, you can also unlock it with iTunes. This method is directed to those ones who synchronize their iPhones with iTunes. It’s also important to remember that you will lose any previous data if you’re using this method.
Actually, unlocking your iPhone with iTunes actually means erasing the whole device so you can also erase the passcode. For restoring your device with iTunes, follow these steps:
  1. Connect your iDevice to the computer you use for sync.
  2. Open iTunes (if you’re asked for a passcode, try recovery mode or another computer where you synced).
  3. Wait for your iPhone to recognized with iTunes.
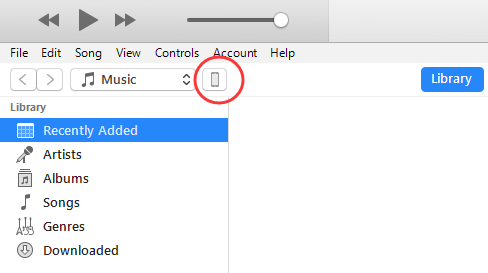
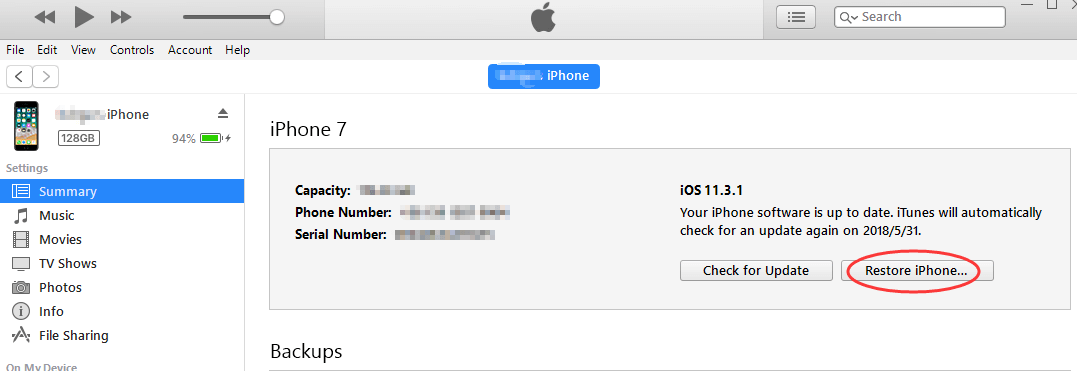
  4. When it’s recognized, select it from the iPhone icon and then go to “Summary”. click on “Restore iPhone”.
  5. iphone-icon
  6. After clicking on it, just keep continue to restore your iPhone. When it finishs, your iPhone lock will be removed.
  7. restore-iphone
  8. 2 iPhone Locked after Update? Unlock iPhone Using Recovery Mode

  9. In case you never synced your iPhone locked after update to any computer, you can still restore it with the recovery mode method. This method will also erase all the data on your iPhone.
    1. Connect your iPhone to your computer. Launch iTunes.
    2. Turn off your iPhone first, then you can put your iPhone into Recovery Mode.
    3. For iPhone 8, iPhone 8 Plus, iPhone X: press and quickly release the volume up button. Repeat with the volume down button. Finally, press and hold the Sleep/Wake button and you’ll see the the icon "Connect to iTunes"
    4. For iPhone 7 or 7 Plus: press and hold the Sleep/Wake button and the volume down button at the same time and keep pressing until you see the icon "Connect to iTunes".
    5. For iPhone 6s or earlier: press and hold the Home button and the Sleep/Wake button at the same time and keep holding until you see the icon "Connect to iTunes".
    6. After connect your iPhone to the iTunes. It will detect that your iPhone is in the recovery mode.
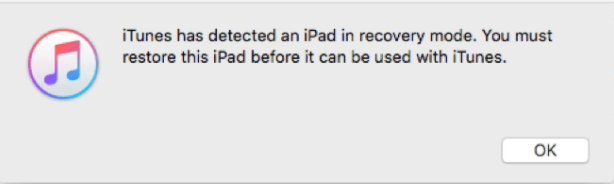
    7. A message will show up and tell you that your iPhone is detected in recovery mode and you should restore it before you can use it.
    8. Just click "OK" and it will be automatically recovered.
  10. itunes-detect-recovery-mode
  11. With these methods, you’ll be able to unlock your iPhone and iPhone locked up after update will no longer a problem. Gihosoft iPhone Data Recovery is a professional iPhone Data Recovery software to get back all your lost text message, photo, video, call history, note, contact and more from iPhone/iPad/iPod Touch. It offers a full solution to recover your lost data in different tough situations. Besides recovering data directly from iPhone, iPad and iPod touch, it also allows you to recover data from iCloud and iTunes backup files.


Wednesday, June 13, 2018

IOS 12 HIDDEN FEATURES & CHANGES SPOTTED

While using iOS 12, more hidden changes and features were spotted.

Here are 10 of them:

  1. Do Not Disturb now has a platter with 3 different options within Control Centre

  2. Before in iOS 11, you simply tapped the Do Not Disturb icon to enable it. Now you can hold on it or 3D Touch to expand the platter. You will see it has 3 different options. Enable DND: ‘For 1 hour’, ‘Until this evening’ or ‘Until I leave this location’.
  1. RAM Management improved

  2. RAM management on iOS 11 was pretty bad. You could leave an app and switch to another one for 10 mins and the previous one would’ve frozen. Now, RAM management is a lot better. I have noticed that some apps from an hour ago are still alive in the multi-tasking.
  1. Reachability can now be used on the Lock Screen

  2. On iOS 11, you couldn’t use Reachability to access the Notification Center from the top. Users found this annoying, especially those who had a Plus model iPhone or the X. Now you can do so to make it easier to access both the Notification Center and Control Center.
  1. Screen Time greys out apps, placing hourglass next to them

  2. iOS 12 brought a new feature which allows to set a time limit for apps in order to help you use your phone less. This feature now greys out applications and places an hourglass next to them when the time limit has been reached. This prevents you from using those applications. However, you can open the app only to be greeted with a ‘Time Limit Reached’ splash screen. This feature is also quite smart. This is because if you try and use the social media website through safari, it will prevent you from doing so there too.
  1. The Apple Books app now has a Default Dark Mode

  2. The Apple Books app now comes with a built in Dark Mode. However, the way it works is that once you go into dark environment, it switches to the Dark Mode. There is not a method right now to keep it in this mode but still is a pretty neat feature.
  1. New Do Not Disturb toggle in System Services Tracking

  2. A new toggle for the Do Not Disturb feature in System Services Tracking has been spotted. This was added due to the fact that DND can now use your location to decide when to put your phone on DND. This is because now you can set DND to stay enabled until you leave a specific location. DND will then track your location and keep the mode enabled until you leave that location which is pretty smart.
  1. Set Up Alternate Face in Face ID Settings

  2. Before, in iOS 11, you could only set up 1 face to use with Face ID. Now you can set 2 faces. This will be the ‘Alternate Appearance’ as it states in the Face ID settings.
  1. Automatic Software Updates

  2. There is a new feature within the ‘Software Update’ section in Settings. If enabled, it will automatically update your iPhones software. This can be kept disabled however.
  1. UI Changes within the Battery section in Settings

  2. There are many UI changes within the Battery section in the Settings app. The ‘Battery Recommendations’ have a new interface. There is now more description on what can be done to improve your battery life. There is also a new interface for tracking battery usage. This includes a detailed graph that shows at what times of the day you use your phone the most. You can click on individual bars on the graphs to view information specifically for that period of time. You can also see up to 10 days of battery usage details just to get an average reading. What’s amazing is that these usage details NO LONGER reset after a reboot.
  1. Low Battery no longer causes iPhone to stutter

  2. Some users have shared that when their battery gets as low as 3%, their iPhone no longer stutters especially when using animations. This is a welcomed feature as in iOS 11, iPhones use to stutter below 10% in order to preserve the little amount of battery life remaining.
Gihosoft iPhone Data Recovery Free:https://www.gihosoft.com/iphone-data-recovery-free.html

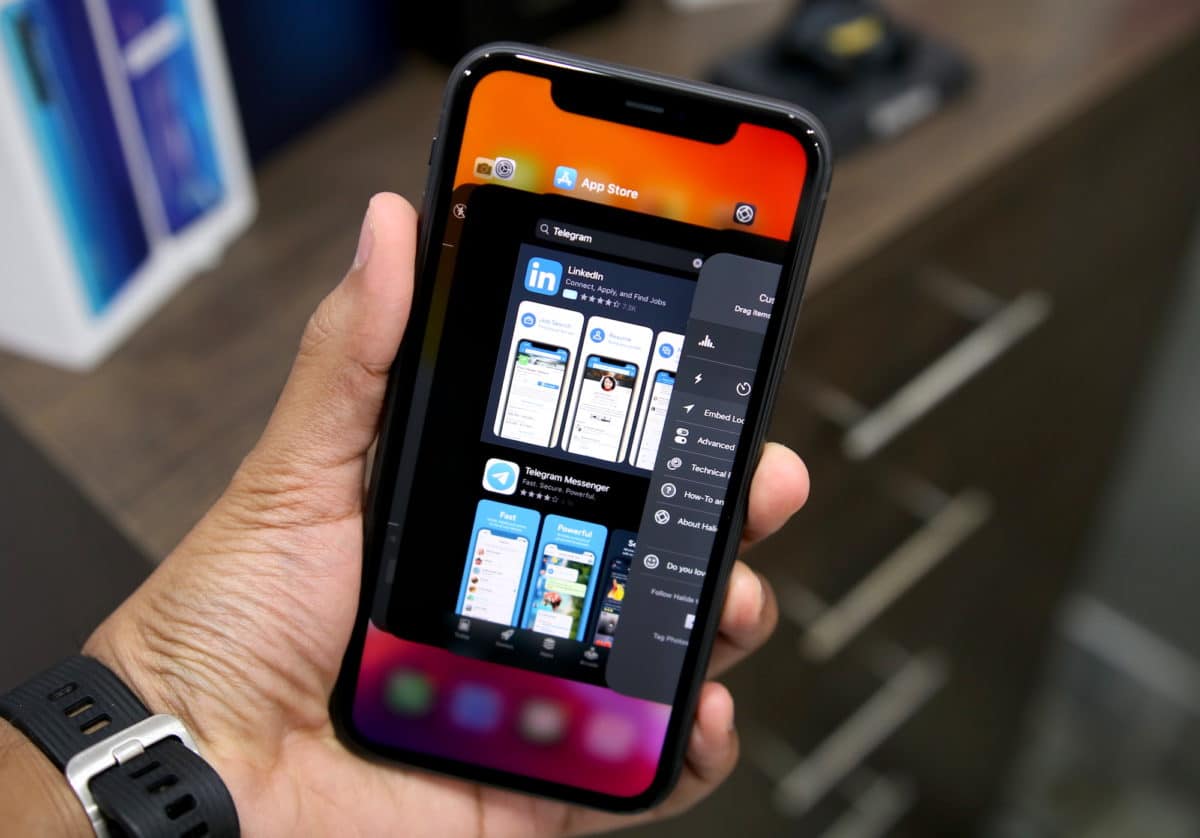
How to Close Apps on iPhone 11, iPhone 11 Pro, and iPhone 11 Pro Max

If you are upgrading to the iPhone 11 or iPhone 11 Pro from an iPhone 8 , iPhone 7, or lower, you are going to take a bit of time to get us...